9+ More Awesome Halloween Decorations for the DIY-er

Awesome (sometimes scary) Halloween Decorations for the DIY-er

I missed Halloween decorating last year due to a house fire, and this year…well I’m going to miss it again due to renovating the new house. You best believe that next year it’s ON!

I have to do it up (full blown Halloween party and all for the kids) before they get too old for this stuff!

I have started my research this morning looking for faux pumpkins and Jack-o-Lanterns; as you can see, it turned into MORE awesome decorations than just pumpkins. OMGosh I can’t wait till next Halloween!! What are your favorite easy/scary Halloween decorations?

Here we go:

(each link will open in a new window)

1.

How to Make a paper Mache’ Pumpkin

http://www.birdsandblooms.com/blog/create-your-own-paper-mache-pumpkin/

photo14-628x416

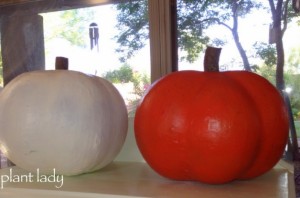
 Simple, yet effective.  Making them look more real is going to be the fun part!

******************************************************************

2.

How To Make a Giant Pumpkin

http://dahlhartlane.blogspot.com/2011/11/giant-pumpkin-tutorial.html

DSC_0407

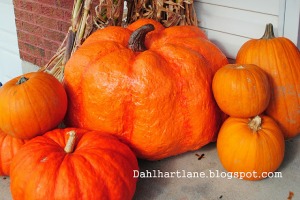
I LOVE this Faux pumpkin technique!  I can’t wait to fill my front porch in large overgrown pumpkins! (maybe with some scary faces mixed in? 😉

******************************************************************

3.

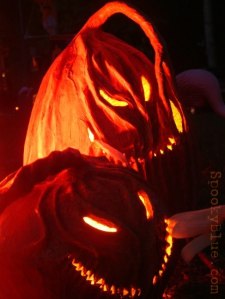
Paper Mache’ Pumpkins…With detail!

http://www.spookyblue.com/halloween/giant-jackolantern/

moth-brothers-4

 ******************************************************************

4.

Pumpkin Creature

http://budgetwisehome.com/no-carve-pumpkin-ideas-4/

No-Carve-Pumpkin-Ideas-spider

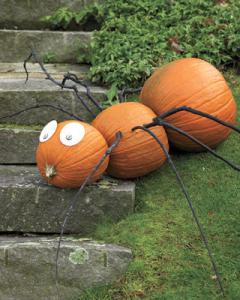
When I first read this blog post, I thought that picture was suppose to be a spider. Wait…Spiders have TWO body segments. So… is this an ant? haha,

Either way, it’s pretty awesome. I just think it would be better if you only used 2 pumpkins, and  painted the pumpkins black! What a neat idea!

 ******************************************************************

5.

Spooky Eyes In The Bushes Tutorial for Halloween

http://www.frugalupstate.com/sponsored/spooky-eyes-in-the-bushes-tutorial-for-halloween/

How-to-Make-Spooky-Eyes-in-the-Bushes-for-Halloween-1024x768

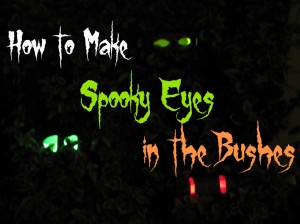
I LOVE LOVE this idea! I’m so behind the times – this is honestly the first time I’ve seen this idea! SOOOO gonna do it!

******************************************************************

6.

Detailed Paper Mache’ Spiders

http://www.stolloween.com/?page_id=36

stolloween2008-27

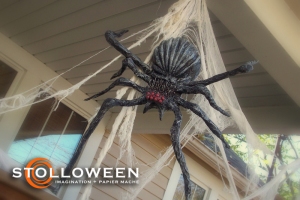
I admit, these are almost too real for my liking.  But aren’t they awesome?

******************************************************************

7.

DIY Bloody Handprint Clings

http://kylyssa.hubpages.com/hub/do-it-yourself-bloody-handprint-window-clings

9343681_f520

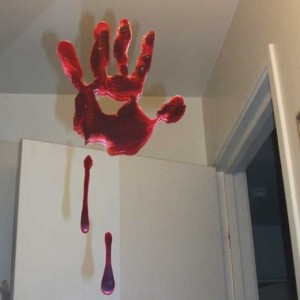
These are fab!  I remember when I was little my brother and I made homemade butterfly clings for

my mom’s kitchen window. She had them for  years! I don’t think we used glue though. (Or did we?)

******************************************************************

8.

Spooky Spider Nest of Arachnophobic Delight!

http://www.instructables.com/id/Spooky-Spider-Nest-of-Arachnophobic-Delight/

FX5G4PYGU45HEX0_MEDIUM

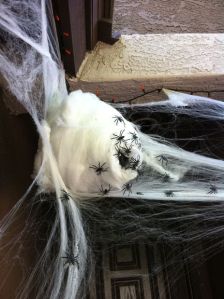
NO Halloween is complete without a spiders nest! Seriously!

******************************************************************

9.

How To Make Human Sized Ghosts

http://www.diynetwork.com/how-to/halloween-decoration-how-to-make-human-size-ghosts/index.html

Original_Halloween-Ghosts-final_s4x3_lg

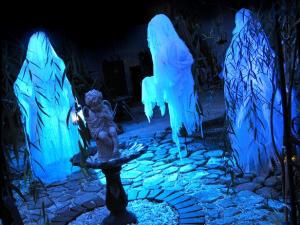
I REALLY want to find a cheap and easy way to make them float around my side yard!  Any ideas?

******************************************************************

10.

10 Epic DIY Halloween Decorations Sure To Make Your Guests Freak

http://inventorspot.com/articles/ten_epic_diy_halloween_decorations_freak

Scary_Monster_on_the_Ceiling_img_assist_customRing_Girl_Prop

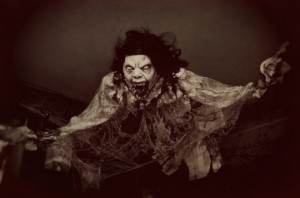
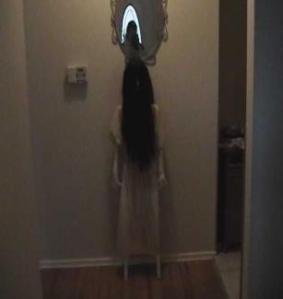
For #10 I thought I’d leave with a blog that has TEN more ideas!  I love the 2 ideas in the pictures above, haha, I could totally

see the bottom one (Ring Girl) hiding in  my bathroom, and the top Ghoul hanging in my foyer as you enter the house 😉 BWAHAHAHA!

I hope you’ve enjoyed my collection of ideas.  If you have some awesome cheap/scary  DIY Halloween ideas, please post them

in the comments 🙂 And don’t forget to share!!

Moms DIY Life


DIY Kitchen Backsplash On A Budget

DIY Kitchen Backsplash On A Budget

A small version of the before and after:
remember_before_after


I’m not going to re-invent the wheel here, therefore I’m not writing a whole tutorial on how to do a tissue paper wall. You can read that tutorial here on the HGTV website:

The video of the tutorial is here: http://www.hgtv.com/crinkle-paper/video/index.html


And article here:

http://www.hgtv.com/decorating/decorative-paint-technique-crinkle-paper/index.html

I will however, tell you that you don’t necessarily have to use tissue paper.  I wanted a backsplash in colors that I couldn’t find anywhere.  With an extremely tight budget I decided I would make my own!  All I used was a paper tablecloth, (heavier than tissue paper), my wall color paint, gel stain, and copper acrylic paint, and semi-gloss poly.  The gel stain that  I used here is the same stain that I am re-doing the cabinets in.

After the paper was applied (I crinkled it to form texture) I waited for it to dry and used the gel stain that I had on hand to wipe it onto the painted paper, then wiped it off.  When that dried, I used a copper acrylic paint (found at any craft store) and applied it with a paper towel in sporadic areas. The copper color doesn’t show well in the pictures (Sorry about that). I also bought a stencil and used the same gel stain to stencil on the scroll design.

When all was dry, I applied 2 coats of semi gloss polyurethane. Trimmed it with the decorative trim and VIOLA! Done!

Don’t pay any mind to the countertops. Those will be redone eventually. The kitchen is still a work in progress. But we are slowly getting there!

Thanks for looking! 😉  MomsDIYLife

backsplash1  detailbacksplash


Home Rehab In a BIG Way pt.1

Yep, we bought a house.  I’ve added a few blog posts about what I am doing with the house, but what I never showed was the blank slate we started with.  Today is the kitchen.  Just blank. Literally. A mess.  Here are the pictures of the kitchen before.

1468667_10201321772724953_2884464883963630045_n 10485777_10201321773204965_2589342284934966520_n 10561550_10201321772524948_4848870645117317686_n 10574366_10201321772124938_5011157875281734525_n 10577035_10201321772324943_8954642708944867469_n


Curtains for the Kitchen!

Curtains for the Kitchen!

Have you ever went shopping for curtains?  I HATE IT! Especially now since they changed it from selling panels in ‘sets’ and now only sell them in single panels. Who’s bright idea was this?

Oh sure, they can make more money, because who wants only half of a window covered up?  Big pet peeve of mine, but I’m not stressing it, because I like to make my own anyway 🙂

I searched high and low for jabot curtain swags for my kitchen. My colors are brown, yellow and copper. (Weird?) HA!  I couldn’t find anything that matched that look, so I took my butt to Joanne Fabrics and emerged with the BEST materials!  I am completely stoked because I found a print that matched my homemade backsplash. (I’m saving the backsplash for another day). But I did add a picture below of the design on my backsplash, and an up close pic of the material pattern.   I still have my camera put away, so I had to use my phone. So please don’t mind the grainy images. I will replace them eventually.  Oh and btw, the ties that are holding up the curtains are dark blue (I need to get black – but haven’t made it back to the store yet.)

The backsplash pic looks reddish in color, I tried to fix it without much luck. I promise you, it’s more brown, but the reflection of the copper color in it is popping through.

Enjoy! And I hope this sparks some creativeness in you to make something of your own that shows YOUR style. Not something store-bought. 😉

largecurtain smallcurtain curtaindetail backsplash


Mom’s DIY Life Heavenly Homemade Bread

Quarantine Bread Mom’s DIY Life Heavenly Homemade Bread

I LOVE to bake but I don’t get to do it very often. I have always wanted to make my own bread, but the recipes always looked too hard, and needed bread flour, (I only buy all-purpose) not to mention I have never owned a bread machine, or dough hook for my mixer (and never will). As a matter of fact, the only mixer I have is a handheld that is missing one of the beaters. That makes for a messy beat, but I manage haha.

Anyhooooo, I found a recipe online for homemade bread – without needing a bread machine or bread flour. I thought I’d try it. It did say to use a bread hook to mix the dough, but I don’t have one – I’m poor, but I have hands, and that works just fine. Well, my first attempt didn’t come out so great in the looks department (or the texture).My husband and kids said it was ok, So I knew the taste was getting there. However; I still wasn’t happy with it. I went ahead and revised the recipe quite a bit to my liking, and here is what I got:

bread

The picture does NOT do this bread justice! You won’t truly know the greatness of this until you can feel and taste this for yourself!

The picture below this one shows what you will need. The only thing NOT in the picture is plastic wrap, the bowl for mixing, the bread pans, and shortening (or Crisco) to grease the pans. All of this was purchased at my local Walmart. The brand name you choose may be different depending on where you shop. (And trust me, I buy the cheapest I can! 

Ingredientsl

Ingredients: Makes 2 loaves – Cut recipe in half for 1 loaf. (Use 8 1/2″ x 4 1/2″ loaf pans)

2 packets active dry yeast; or 5 tsp active dry yeast

2 1/4 C. Warm Water

6 C. All-Purpose Flour

2 1/2 tsp. Salt

6 Tbsp Sugar

4 tsp. Wheat Gluten (found in same area as the yeast at the store)

3/4 C. Butter (1 1/2 sticks) softened

1/2 C. Dry Powder Milk

1 C. Instant Mash Potato Flakes *Use about a Tbsp or 2 less water if your house is humid.

Directions: 1.) Remember that yeast is a fussy ingredient! Dissolve the yeast in 1/4 cup of water that has a temp of at least 105°F and no more than 115° – I use my candy thermometer to test the water temp before putting in the yeast. If you go over 115°F you run the risk of killing the yeast and the bread won’t rise. Too low a temp and the yeast won’t activate. You’ll know if your yeast has activated if it expands and bubbles.

2.) Combine all of the dry ingredients in a large mixing bowl and mix well. Add the Butter, Warm Water, and Yeast.

3.) Using your hands, mix everything until a very soft dough forms. If kneading by hand, this should take about 10-12 minutes. (7 minutes if using a dough hook on a mixer). Your dough should be kind of sticky, but not dry. A lot of failure in bread making is not kneading it long enough and/or adding too much flour. You also shouldn’t add flour unless your dough is absolutely impossible to pick up.

4.) Place your dough in a lightly greased smaller bowl (Just remember the dough will expand!) Keep it covered with a warm wet towel. (Some people use a dry towel, but I wanted to make sure my dough wasn’t going to dry out.) Let rise for 2 – 2 1/2 hours. Rising time just depends on how warm your house is. The warmer it is, the faster it rises. Dough should be double in size when it is done rising.

5.) Remove towel and punch the middle of the dough to deflate it. Separate into 2 halves. Set one half on the table (If it will stick to the table, sprinkle with a ‘little’ bit of flour – but not much). Use a rolling pin and roll into a rectangle shape. (but not longer that an 8″ inch loaf pan). Roll up from one long side to the other and place into the greased loaf pan. Repeat with other loaf.

6.) Spray cooking spray on a piece of plastic wrap and lay it over top of the loaf pan. Loosely, you don’t want to restrict the rise. Let those rise again until the bread is about 1 1/4″ inch over the top of the pan. This could take 1 to 2 hours. Again, it varies by temperature.

7.) Preheat oven to 350°F and bake for 15 minutes. Put a piece of foil loosely on each loaf and resume baking for 20-25 minutes. The internal temperature of the bread should be about 180°F – 190°F (although mine only got to 150°F and I had to take it out since the tops were getting done way to fast. (I didn’t have Foil) :/ O-well. I am happy with it!!

8.) Once baked, remove from oven, flip them out on cooling racks. Now, you CAN let them cool sitting out…but I have found that spreading butter on the top, and putting into bread bags (Or wrap with plastic wrap) right away while they are warm, keeps everything moist (Even the crust!)

I hope you enjoy your bread as much as we do here! If you use this recipe, let us know – We’d love to hear from you!

Take care! Renee’

#QuarantineBread

Visit our Website: https://www.steelewizardcreation.com


Mom Bucks Template and Chore Chart

Like most moms, I fought and fought to find a way to make my kids (ages 12 and 14) do their chores without fighting! I failed miserably.

Here is my newest adventure. Day one is over and I must say they did good! So here are the templates. They are pretty self- explanatory. The Chores list is long, because my kids (no I’m not a perfect supermom, and my kids aren’t perfect either) are hard headed and they need everything spelled out for them. What I mean is…when I say “clean the kitchen” They hear, “Do half the dishes in the sink”

So yes, the chore list I will print once a week is long (All 7 pages!) But if it gets the work done, then so be it 🙂 Here is a preview:

BTW I am a realist. I KNOW not everything will get done everyday. They have the option of making as much money as they want for the week. But at least I know they are doing SOMETHING, which is more than they were doing 😀

ChoreChartSample2

The great thing about using ‘mom bucks’ is…my kids will now either have to pay for the things they want – that are typically privileges, (like a can of soda, or an hour of computer time etc.) OR they can save it up and cash it in for real money at the end of the week. (Without completely breaking me!

Let me know what you think of the chore chart 🙂

LINKS HAVE BEEN UPDATED AS OF 8/17/2021

Did I mention the .doc is Editable, change the chores, the cost of each chore Etc.  The .pdf is NOT editable – Don’t forget, if you laminate them, they will last a long time!

You can purchase it from our website here and download immediately: (Our website is safe and secure) 🙂

Chore chart: .Doc & .Pfd

Teenage Chore Chart With Mom Bucks


Visit our website: https://www.steelewizardcreation.com

If you’d like to purchase from Etsy instead, you can do that here:

https://www.etsy.com/listing/722263384


DIY Photo Blocks – Faux Canvas Photo

DIY Photo Blocks – Faux Canvas Photo

I have been seeing these DIY photo canvases all over the net, and well – the photographer in me says “NO Just order a canvas and be done with it” , While the crafty me says “you HAVE TO try this!” My crafty side won.

Here is my first attempt at photo blocking.  (aka FAUX CANVAS PHOTO) It may not be done on canvas, but I can tell you, If I made a canvas tutorial, it would be done the same way.

First off let me begin by saying, I have seen tutorials and DIY blogs that tell you that you MUST use a laser printer, and/or you MUST use a purchased print of your photograph. I’m here to tell you that neither of these are true. I created mine using my inkjet printer and Matte Presentation paper. ( HP 32lb premium presentation matte) You will want to buy the paper type that matches your printer. I have an HP printer, therefore I use HP paper.

ONWARD!… What you need:

  • Photoshop (or image editing software to size your images)
  • Printer
  • Matte Presentation paper
  • Roller – you can buy a roller or use a thick wooden dowel like I used here.
  • Mod Podge (I use Matte, but glossy will work as well)
  • Wood Blocks (I used scrap pine that my husband had laying in the garage)
  • Foam brush
  • Stippling or hard bristle paint brush
  • Acrylic paint  – your choice of color
  • Scissors or cutting board   materials

It looks like a large list, but if you are a crafty person, you probably have most if not all of this stuff laying around the house anyway. In the image above I had already prepare my image – sized, printed and cut out. The wood block was painted with the acrylic paint. I did paint the backside all the same color, but the side that the image is going onto doesn’t have to be painted fully. Just be sure you get all the edges.

Apply the Mod Podge to your board. you don’t have to make this thick, just enough to make sure the image will stick all the way around.

applyglue

Starting at one corner, press your image onto the board and Mod Podge layer. Gently use your finger from middle to edges to push out air bubbles. Use your roller as shown below to push out any extra air bubbles and to really make the edges lay flat. (If you don’t have a roller, a great alternative would be either a rolling pin or a hard plastic cup.

rollout

Once this is done, let it dry completely. With Mod Podge, it doesn’t take that long. Using a hair dryer speeds it up tremendously. you can also check on extra air bubbles and push those out while you wait.

Now you are going to take your acrylic paint and stipple a bit of paint around the picture edge. How far onto the picture you go is up to you, but it really is a great way to hide any uneven cuts or hard picture edges.

paintedge

The stippled paint you just put on has to dry completely. I don’t suppose you want a glue/paint streak across your image? meh, didn’t think so 😛

Once dry you can add the first coat of Mod Podge to the top of the image. How many coats you put here is up to you. I like to do two coats. The first coat I put on I make the streaks go all one way, the second coat I make the streaks go the opposite way. (let them dry in between coats!)  This gives it a crisscrossed canvas-like texture that I absolutely adore! I see so many times that some people like to try and get it all smooth and shiny…WHY? Texture is the way to go baby!

gluetop

Yes, the Mod Podge goes on white, but I promise it dries clear!!

The finished product…My pictures do NOT do these little bad boys justice! I made these ones for my sister…She loved them!

finish2

I hope you enjoy your next Photo project 😉

Until next time………..

If you are a photographer or just like to play around with your images in photoshop etc…Visit my webpage, you may find something you like! Link Below:

https://www.steelewizardcreation.com

or visit us on Etsy: https://www.etsy.com/shop/SteeleWizardCreation

paintedge


Been Busy

I cannot believe how busy I have been lately. Between updating my website, trying to create something new, having conttests on my FB page, Kids, and school. WHEW! It really is neverending.

So even though I haven’t posted anything worthwhile in quite some time, I wanted you to know, I am STILL here…making changes, Hopefully for the best.

Take care for now 🙂

Ne’


St. Patty’s Day Photo Template

St Pattys Day Photo TemplateI hope this isn’t too early, I mean, considering it IS March and all, I figured I’d share a St Patty’s day template with you. (Why do people spell that as “Paddy” ? Isn’t Patty’s Day short for Patrick’s Day?)  anyhoooo…

The zip file includes both a 5×7 and 4×6 template.  I left it wide open in usage, so you can use it for your scrapbook, an invite, or whatever *wink.

Link for download: http://bit.ly/ihPrSF

I hope you enjoy…oh and by the way, if you download it – leave a comment and let me know!


Good Morning!! I think :/

I don’t feel as if I’m getting everything together as fast as I want for this blog. It’s frustrating really! I have SO much to share and not enough time! Between School, 4 kids, revamping my website, and creating new things for everyone, I need about 20 of me to get it all done in a timely manner.

I’m feeling a little frazzled!    <–that’s not really me!

It’s all good I guess. Other than the kids, no one is making drastic requests of me just yet.  I did want to point you in the direction of my website though. Yes, it is under construction – I think I FINALLY found the ‘look’ that I want to stick with. At least until I get bored lol. Check it out, especially if you’re a photographer and if you love to play in photoshop.  http://www.nescreationdesigns.com – remember, I’m still working on it, so don’t slam me too hard *smile.


What am I doing? Quick Ramble.

As if I don’t have enough on my plate, I started this whole blogging thing. LOL it’s ok, I needed a better way to connect with my fans, I think I got it down. Although I suppose that remains to be seen. I have alot to share, and it’s going to take awhile to get it all up and posted. So hopefully most of you will be patient with me.

Ne’


8×10 Storyboard Template

I have a lot of older templates that I think I’m just going to share for free. Here is one of them. It’s an 8×10 .psd file. The background layer is transparent so you can drag and drop your pictures under. ENJOY!    Go here to download: http://www.mediafire.com/file/fybzlzqlxe1/NeOurFamilycollage2.zip


STOKED!

I am happier than I don’t know what!  Due to a recent harddrive crash on …not just one – but TWO harddrives, I thought I lost this little baby.

When I first got my Wacom tablet (CINTIQ 12WX) I couldn’t wait to use it! So of course, the type of person I am, I couldn’t  just do a few scribbles on it to get the feel of it, I had to go all out and do an actual freehand drawing.  Ok, so I cheated and used photoshop brushes for the diamonds and the sparkles, but at least I can say I did the whole rose freehand! Even down to the veins in the rose! It took me a long time to do, So I am STOKED that I found the large file and wasn’t stuck with just having the small thumbnail saved. 🙂

You can download the large version here to print:

http://www.dreamstime.com/royalty-free-stock-image-delicate-blue-rose-image9147026

I’m definately not an affiliate of Wacom, but I had to share, these things are the *hit! 😉   http://www.wacom.com/cintiq/


Vintage Pink Free Story Board Template

Don’t forget to share & tag me! http://www.facebook.com/NCDesigns4U/

Link for downloading template below:

http://www.mediafire.com/download.php?0qvzzpk9z9j23qy


Older Digital Paintings

I wanted to share these for now as they are the older paintings I have. The painting of the man is my husband. Someone we know said it has that “300 look” (as in 300 the movie). I think 300 is much darker than this, but hey, he referenced it to that movie and followed up with “That’s awesome looking! I want one!” So he can call it whatever he wants! LOL